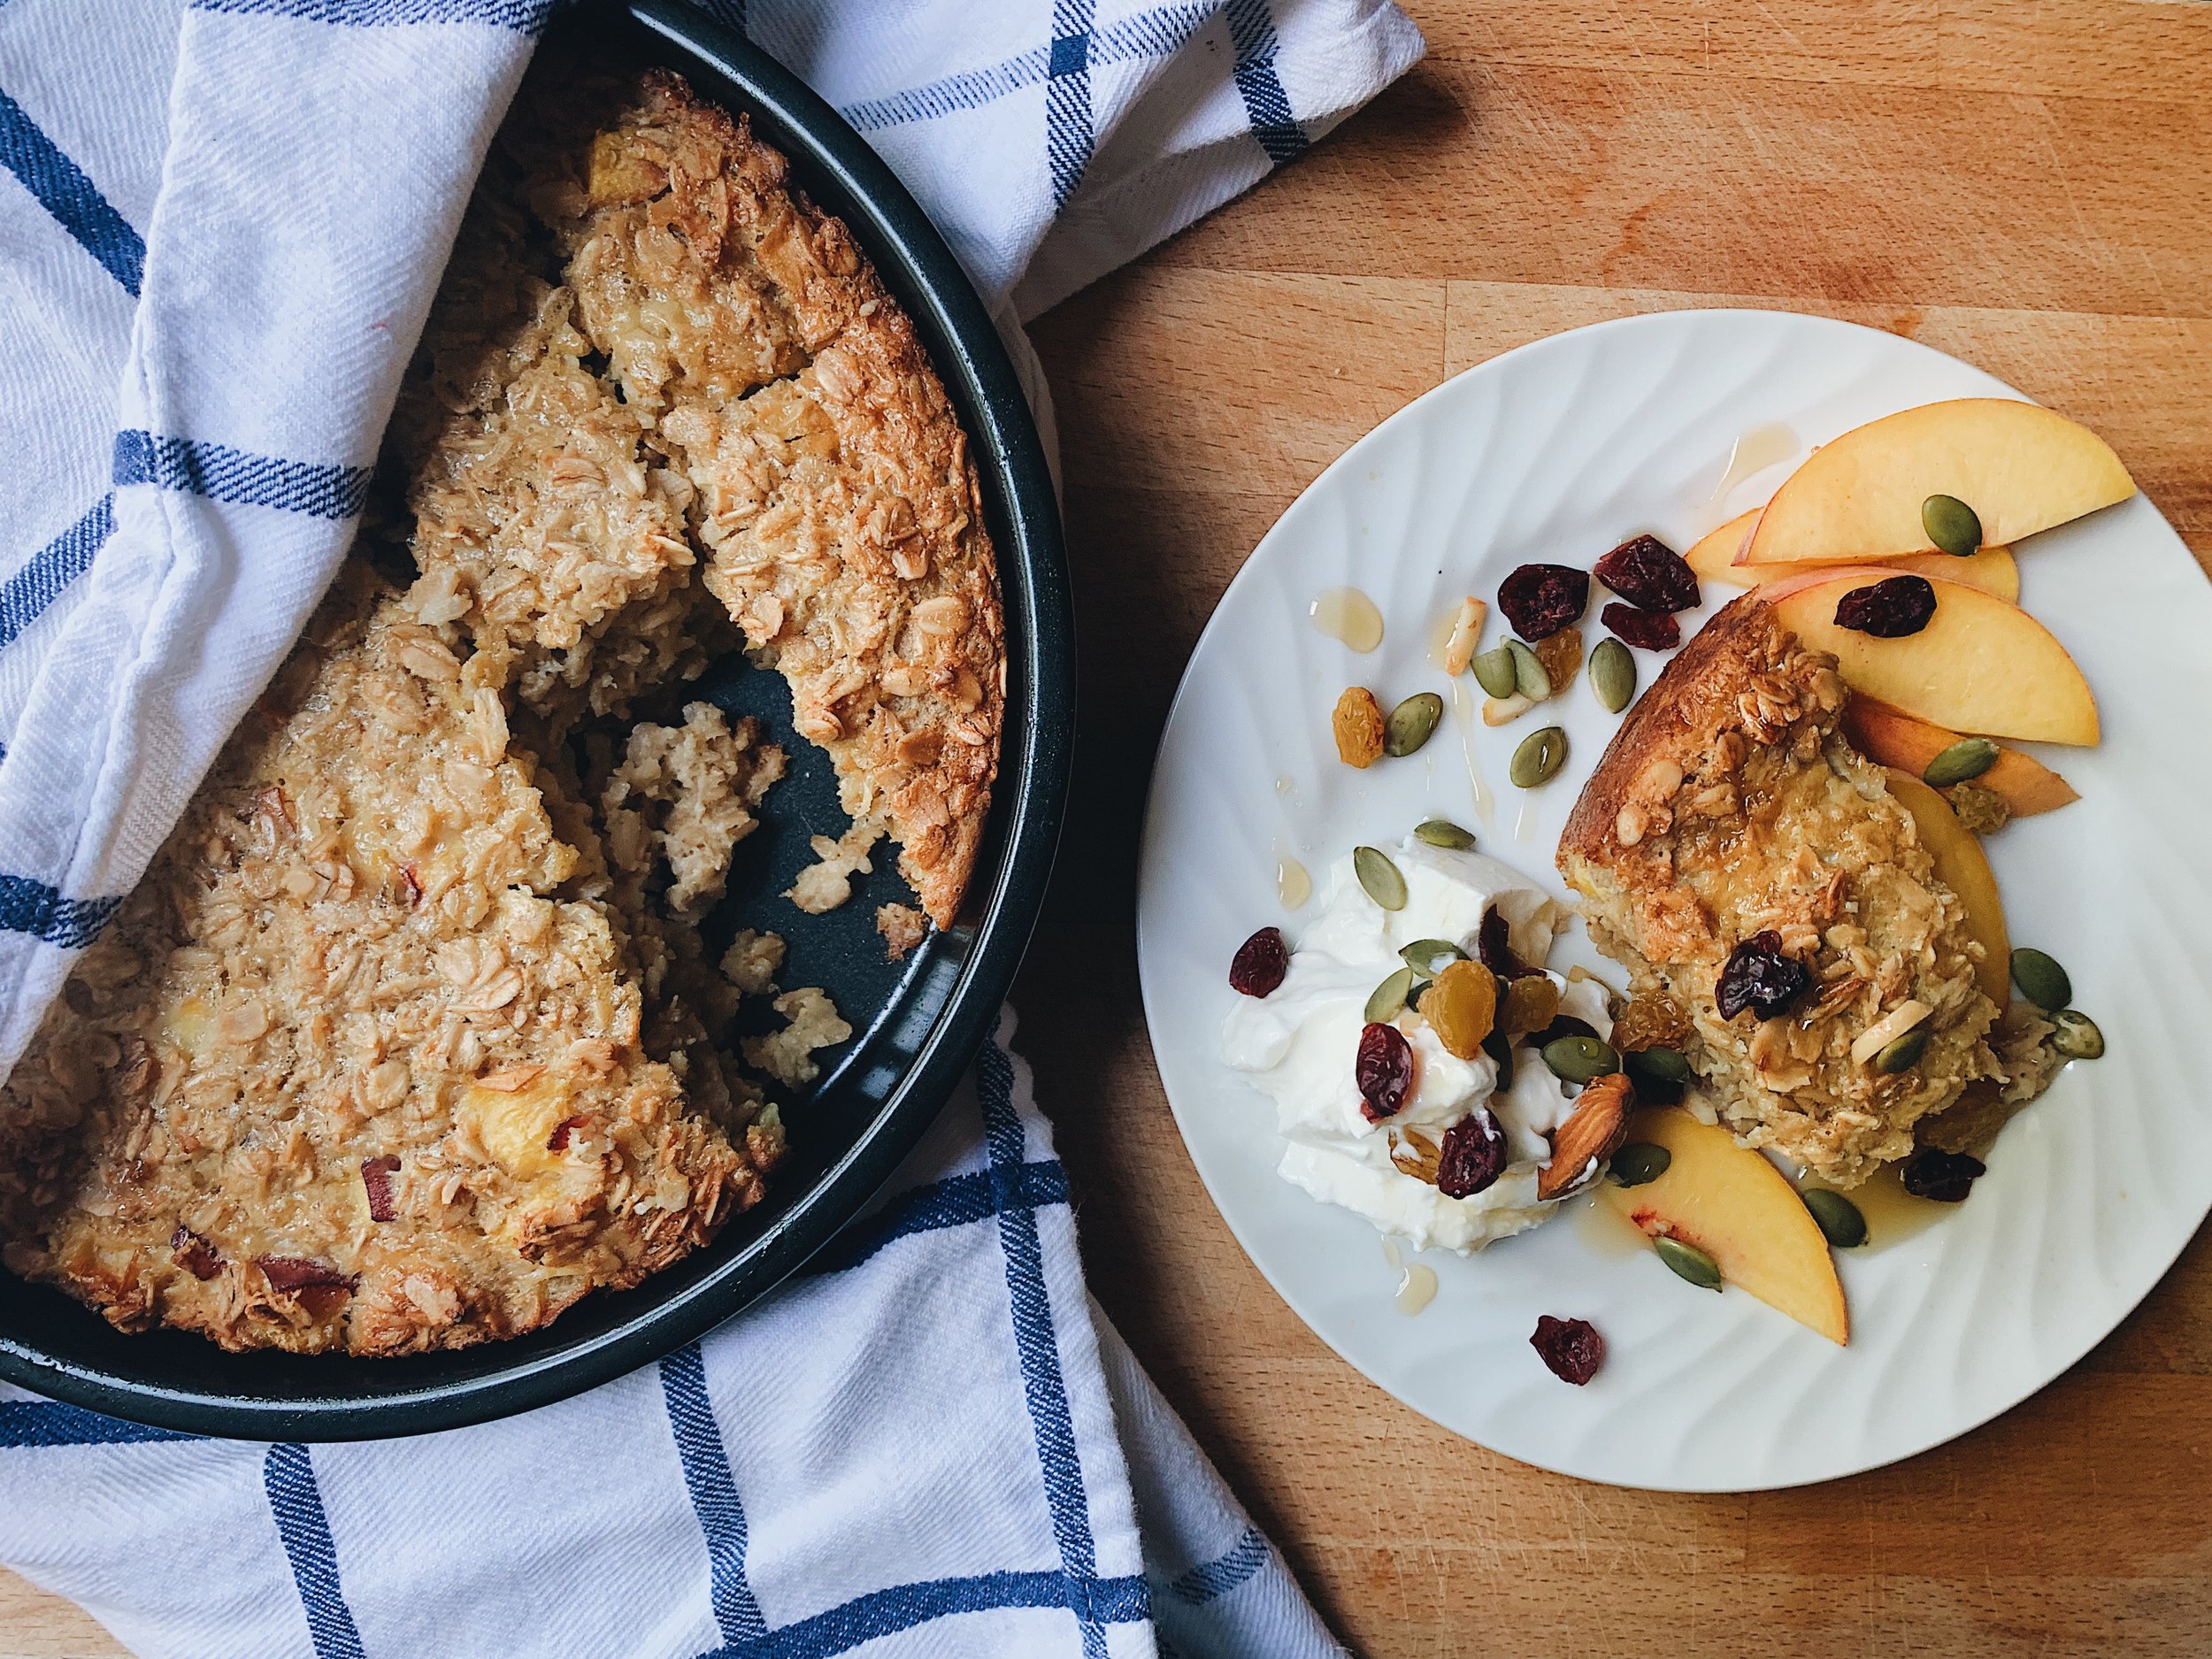
Baked Oatmeal

Breakfast is the most agile meal in our home.

On weekends its a slow first cup of coffee and flipping through cookbooks for the best frittata recipe. It’s Dutch pancakes with different fillings and homemade whipped cream. Sometimes it’s a walk to one of the 15 new coffee shops in our neighborhood because gentrification somehow means there needs to be a latte available on every corner. You can roll your eyes at the above, it’s fine. I would too.

On weekdays, things are different. Monday through Friday mornings are a mad dash to get showered, dressed, coiffed, tinted moisturized, caffeinated, and somehow manage to both feed and take out the dogs while preparing Ben a semblance of a well balanced breakfast. Healthy carbs + fruit + protein + no sugar. I’m sure I’m missing something like organic flax seeds but honestly, aren’t we all just slowly coasting to our kids demanding Fruit Loops in three years? Let’s be real.

Anyway, all this to say that weekday mornings are kind of a shit show and I’ve given my child frozen waffles with a side of plastic container freed berries more than I’d like to admit. But, like any modern mom who’s writing a confessional blog for all 35 of you to read, I’m trying to get better. Plan things, balance between small luxuries of weekends and the hurricane of weekdays. That is, unless I’ve procrastinated on work emails from the night before in which case frozen waffles it is because gotta get that paycheck to buy the frozen waffles. It’s a vicious circle, really.

In comes baked oatmeal. It’s on the healthier side of the breakfast spectrum. Not like a pancake or a biscuit which sound like you’re feeding your kid straight to diabetes. Oatmeal can be fancy, healthy, delicious and it just sounds like you’re being a good parent. “I made my child oatmeal! Then we frolicked in a field while he engaged a full range of emotions by singing to the birds, touching dewy grass, and only wearing a sustainable linen romper.” You get the point.

This oatmeal can be adapted in a myriad of ways and here’s the best thing - its a dream for making ahead of time because it lasts in the fridge! Also, it’s not breakfast in a jar which is a trend I am 100% over at this point. (Chia seeds have had their moment, have they not? How much cold mush that’s been sitting in almond milk can we consume before we admit to ourselves its not actually that good.) Basically, you bake oatmeal in whatever milk and filling you choose then serve it like some fancy breakfast cake.

BF7D8AD8-D259-466A-AB8E-48861B6452C8.JPG


Seriously, it’s easy and dirt cheap because oatmeal is like $3 for a container to feed a family through the apocalypse. I made ours with peaches from the market to keep my Brooklyn blogger cred but you can make it with frozen berries that everyone has sitting in their freezer from three months ago and it’s just as good.

Baked Oatmeal

Ingredients

  • 3 cups old fashioned rolled oats

  • 3 eggs

  • 1.5 cups milk

  • 1 tsp baking powder

  • 1 tsp cinnamon

  • 1 tsp vanilla extract

  • Scoop of honey or sweetener of your choice, about 2 tbsp.

  • Berries, stone fruit, apples, chocolate chips, live your best filling life here. Or just use whatever you have in your pantry, who has the time or energy to really deliberate this one.

  • Almonds, walnuts, pecans… seriously go nuts.

  1. Preheat over to 350F.

  2. Butter a pie dish or 9 inch square baking dish if you have that on hand. Someday I’ll have a kitchen with all the things. Today is not that day. It was either a small pie dish or a lasagna pan and this recipe is good but it’s not lasagna size good. You know? Portion control.

  3. Mix all the dry ingredients.

  4. Mix all the wet ingredients.

  5. Mix them together.

  6. Pour into baking dish and stick in the oven.

  7. Come back about 35-40 min later when the fruit is bubbly and the top of your oatmeal is solid.

  8. Serve with a dollop of whipped cream or yogurt and some strong coffee. Add fruit or nuts and drizzle some honey or maple syrup if you plan to shill it on social media.

  9. Store in the refrigerator, covered for up to 4 days. To reheat, put in a bowl and pour a bit of milk on top to moisten then microwave for a few.

7395415E-CB80-4B49-AA68-10666AF301FE.JPG
BAE06A06-0DAA-4855-9DD2-81BC238D55CD.jpg


The Pancake Alternative

When I was pregnant with Ben, to my surprise and to the surprise of everyone who knows me well, I had only one craving. Pancakes. I always thought that I would crave the obvious - pickles, ice cream, potato chips? But, no. All I wanted breakfast, lunch, and dinner were fluffy, drenched in syrup, pancakes. I ate so many pancakes that I'm almost certain that when the time comes, Ben won't be able to stand the sight of them. Poor kid was force fed pancakes in the womb for weeks on end. 

Every Saturday of my third trimester, while Ian posted up to watch soccer, I made us pancakes. I experimented with many recipes - banana, blueberry, chocolate, revisited my trusty favorite Brown Butter Greek Yogurt Pancakes and even made a pancake "cake" one time which was... let's just say, not to be repeated. The craving went so far that one time I even marched myself to the grocery store at 7:30AM on a Sunday, at 38 weeks pregnant, because we were out of eggs. No eggs, no pancakes. Three cheers for my ever patient husband for never denying my request to make him pancakes and silently working his way through stacks and stacks of flapjacks. For the record, he's not a huge pancake fan. 

Slowly, the weekend pancakes have turned into a tradition of making weekend breakfast. To switch things up a bit we've branched out - biscuits with bacon and eggs, frittatas, bagels, all the variants of breakfasty things. Pancakes make an appearance in the rotation, but not nearly as often. Because, let's be honest, whether out of a box or made from scratch - a pancake is a pancake. You can add all the bells and whistles in the world but, its really not that special. (Of course, I say this now, with the rose colored glasses of pregnancy hormones no longer surging through my body.) This is all to say, the cravings have subsided. 

A few weekends ago, I decided to revisit a recipe from my childhood - syrniki. In Russian, they roughly translate to "cheese cakes". The traditional syrniki are made with a variant of cottage cheese called tvorog. It's a bit tangier and if anything, a form of quark. Unfortunately, tvorog isn't readily available in Clinton Hill and the only place to really get it is at an Eastern European speciality store or by traveling to Brighton Beach. The former isn't in my neighborhood and the latter is too far a trip. When you have a three month old flopping around on a play mat, taking a 45 min trip for a special kind of cheese just doesn't happen. 

So, as always, I improvised. Truth be told, I had a tub of cottage cheese which was about to expire so I used that in place of tvorog. What came out is as close to the traditional syrnik as I've had in ages and a great alternative to the pancake. The syrnik is lighter and smaller in size and it holds up as a leftover. (Have you had leftover pancakes? Unless you're hungover, they're disgusting.) Syrniki can be served with fruit preserves or even sour cream. I prefer mine drizzled with a little honey and spatter of powdered sugar, strong black coffee on the side.

IMG_4433.jpg
IMG_4436.jpg

Syrniki 

Ingredients

  • 2 cups cottage cheese

  • 1.5 cups flour, divided.

    • 1 cup for the dough, 1/2 cup for dredging.

  • 2 eggs

  • 1/3 cup sweet golden raisins (I didn't grab a photos of these but imagine a very dehydrated grape.)

  • 1 tsp. cinnamon

  • 2 tbsp. honey or agave syrup for sweetness

  • dash of vanilla

  • vegetable oil for cooking

  1. Mix all wet ingredients in a large bowl.

  2. Fold in flour and raisins until well mixed.

  3. Heat a non-stick or cast iron skillet on the stove and pour in a glug of veg oil.

  4. Use your hands to form small patties with the dough. It will be very sticky!

  5. Dredge each patty in flour and place on the skillet.

  6. Cook each syrnik for 1-2 min. until golden, then flip until the other side is golden.

  7. Repeat the above step 1 or 2 more times until your cakes have an outer crust that's a darker golden brown.

  8. Keep adding veg oil to the pan and cooking the syrniki (syrnikis? pluralizing Russian words is a forever mystery).

  9. Serve hot for breakfast with a drizzle of honey and powdered sugar. Can also be eaten with fruit preserves and some fresh berries on the side! The leftovers can be kept in a sealed container in the fridge for up to 3 days.

IMG_4408.jpg
IMG_4414.jpg
IMG_4411.jpg
IMG_4432.jpg
IMG_4437.jpg

Brown Butter- Greek Yogurt Pancakes

I don't really love pancakes. When going out to eat I never order them because they feel boring, not an indulgence. I also barely make them at home because whenever I do, I regret it instantly. They're the kind of food that make me think all the effort isn't worth the result. Mostly I end up feeling heavy and the pancakes sit on the bottom of my stomach like a giant lump of processed flour. For lack of a better way of presenting it-  pancakes give my stomach a hangover. 

That being said, I do love a weekend ritual. Something that signifies that you're out of the weekly rush and into the relaxed, easy feeling of a Saturday or Sunday morning. Leisurely, with nothing to do but sip some coffee, eat breakfast, and lounge around with the pups. At first I tried waffles, unfrozen and popped into the oven (going on 15 months without a microwave). Although satisfying, something about frozen waffles feel amateur and reminiscent of  college food. I wanted something delicate but not requiring a ton of effort. Interesting but simple. Basically, it was a very specific craving and I did what I always do when I can't put my finger on exactly what I want: open the fridge and peruse the leftovers. 

On a Saturday morning a few months ago, I found a container of Greek Yogurt in the back of the fridge. One small scoop used as a topping for something or other but most of it intact and on the verge of it's expiration date. Right beside it was half a stick of butter, taking up space in my teeny fridge. On the ledge right below, some ripe bananas I had taken off the counter because they were attracting fruit flies. With these simple, left behind ingredients, the Brown Butter- Greek Yogurt pancake was born. 

Something between a pancake and a crepe, the result is nutty and not too sweet. It's the perfect balance of delicate and filling. Seriously, I'm addicted. Give this recipe a try this weekend! If you have guests in town for Labor Day I guarantee these will be a huge hit with everyone. 

Brown Butter- Greek Yogurt Pancakes

Ingredients

Mix everything together in a large bowl. add your cooled brown butter last. 

Mix everything together in a large bowl. add your cooled brown butter last. 

  • 1 container Greek Yogurt, I used 7 oz. of Fage
  • 1 cup all purpose flour
  • 2 eggs
  • 2 ripe (or normal) bananas, mashed
  • 1 tsp. honey
  • 1 tsp. cinnamon
  • pinch of salt
  • chocolate chips, raisins, powdered sugar... any pancake filling/topping you like!

For Brown Butter: 

  • 1 stick unsalted butter
  • 1/2 stick for cooking the pancakes

Prep: 

  1. Prepare your brown butter. Many a great chef has put together much more comprehensive directions for this than I can provide. I've linked a tutorial here but basically: melt your butter on medium heat and then whisk that goodness until it's nutty and brown bits form on the bottom. 
  2. Set aside. You want your butter to cool before you pour it into the pancake mix. Otherwise, you'll cook your eggs and your pancakes will taste like a crepey-omelette which... no. Don't do that. 
  3. Mash bananas with a fork. Some serious culinary technique is required here. I've added a visual because this move is so stunningly complex. (Clearly this cutting board has seen many a mashed banana.)
mashed banana. an exercise in technique. 

mashed banana. an exercise in technique. 

Do the thing: 

  1. Combine all dry ingredients in a big bowl. 
  2. Add wet ingredients including most of the brown butter. Reserve some for drizzling. 
  3. Stir everything together until combined and smooth. 
  4. Heat up a non stick skillet with a dollop of butter and place heaping spoonfuls of batter on the sizzling surface.
  5. This next part is the hardest piece of the entire recipe. You have to wait for the edges of the pancakes to brown and develop a crust before flipping. Because the batter is not super thick, your pancakes will risk falling apart. Wait for the crust, then flip. Don't worry if the bottom is not your normal pancake color- these aren't normal pancakes!
  6. Stack on a plate and drizzle with the reserved brown butter. Now add maple syrup, agave, honey, chocolate sauce... anything you want! Enjoy!